
1.Niginx主配置文件參數詳解 a.上面博客說了在Linux中安裝nginx。博文地址為:http://www.cnblogs.com/hanyinglong/p/5102141.html b.當Nginx安裝完畢後,會有相應的安裝目錄,安裝目錄里的nginx.confg為nginx的主配置文件
1.Niginx主配置文件參數詳解
a.上面博客說了在Linux中安裝nginx。博文地址為:http://www.cnblogs.com/hanyinglong/p/5102141.html
b.當Nginx安裝完畢後,會有相應的安裝目錄,安裝目錄里的nginx.confg為nginx的主配置文件,nginx主配置文件分為4部分,main(全局配置)、server(主機配置)、upstream(負載均衡伺服器設置)以及location(URL匹配特定位置的設置),這四者的關係是:server繼承main,location繼承server,upstream既不會繼承其它設置也不會被繼承。
c.Nginx是一個代理伺服器,一般情況下,網站是不能部署在Nginx下的,比如用Java開發的JavaWeb程式,我們部署在tomcat下,然後使用Nginx代理將網址指向tomcat即可。
2.Nginx.conf配置文件詳細說明(附備註)
  1 #  kencery 註釋說明Nginx文件
  2 #  時間:2016-1-19
  3 #  學習內容,只是來自互聯網,有版權問題請聯繫我刪除。
  4
  5 ########   Nginx的main(全局配置)文件
  6 #指定nginx運行的用戶及用戶組,預設為nobody
  7 #user  nobody;
  8
  9 #開啟的線程數,一般跟邏輯CPU核數一致
 10 worker_processes  1;
 11
 12 #定位全局錯誤日誌文件,級別以notice顯示,還有debug,info,warn,error,crit模式,debug輸出最多,crir輸出最少,根據實際環境而定
 13 #error_log  logs/error.log;
 14 #error_log  logs/error.log  notice;
 15 #error_log  logs/error.log  info;
 16
 17 #指定進程id的存儲文件位置
 18 #pid        logs/nginx.pid;
 19
 20 #指定一個nginx進程打開的最多文件描述符數目,受系統進程的最大打開文件數量限制
 21 #worker_rlimit_nofile 65535
 22
 23 events {
 24     #設置工作模式為epoll,除此之外還有select,poll,kqueue,rtsig和/dev/poll模式
 25     #use epoll;
 26
 27     #定義每個進程的最大連接數,受系統進程的最大打開文件數量限制。
 28     worker_connections  1024;
 29 }
 30
 31 #######Nginx的Http伺服器配置,Gzip配置
 32 http {
 33     #主模塊指令,實現對配置文件所包含的文件的設定,可以減少主配置文件的複雜度,DNS主配置文件中的zonerfc1912,acl基本上都是用include語句。
 34     include       mime.types;
 35
 36     #核心模塊指令,智力預設設置為二進位流,也就是當文件類型未定義時使用這種方式
 37     default_type  application/octet-stream;
 38
 39     #下麵代碼為日誌格式的設定,main為日誌格式的名稱,可自行設置,後面引用
 40     #log_format  main  '$remote_addr - $remote_user [$time_local] "$request" '
 41     #                  '$status $body_bytes_sent "$http_referer" '
 42     #                  '"$http_user_agent" "$http_x_forwarded_for"';
 43
 44     #引用日誌main
 45     #access_log  logs/access.log  main;
 46
 47     #設置允許客戶端請求的最大的單個文件位元組數
 48     #client_max_body_size 20M;
 49     #指定來自客戶端請求頭的headebuffer大小
 50     #client_header_buffer_size  32k;
 51     #指定連接請求試圖寫入緩存文件的目錄路徑
 52     #client_body_temp_path /dev/shm/client_body_temp;
 53     #指定客戶端請求中較大的消息頭的緩存最大數量和大小,目前設置為4個32KB
 54     #large client_header_buffers 4 32k;
 55
 56     #開啟高效文件傳輸模式
 57     sendfile        on;
 58     #開啟防止網路阻塞
 59     #tcp_nopush     on;
 60     #開啟防止網路阻塞
 61     #tcp_nodelay    on;
 62
 63     #設置客戶端連接保存活動的超時時間
 64     #keepalive_timeout  0;
 65     keepalive_timeout  65;
 66
 67     #設置客戶端請求讀取超時時間
 68     #client_header_timeout 10;
 69     #設置客戶端請求主體讀取超時時間
 70     #client_body_timeout 10;
 71     #用於設置相應客戶端的超時時間
 72     #send_timeout
 73
 74     ####HttpGZip模塊配置
 75     #httpGzip modules
 76     #開啟gzip壓縮
 77     #gzip  on;
 78     #設置允許壓縮的頁面最小位元組數
 79     #gzip_min_length 1k;
 80     #申請4個單位為16K的記憶體作為壓縮結果流緩存
 81     #gzip_buffers 4 16k;
 82     #設置識別http協議的版本,預設為1.1
 83     #gzip_http_version 1.1;
 84     #指定gzip壓縮比,1-9數字越小,壓縮比越小,速度越快
 85     #gzip_comp_level 2;
 86     #指定壓縮的類型
 87     #gzip_types text/plain application/x-javascript text/css application/xml;
 88     #讓前端的緩存伺服器進過gzip壓縮的頁面
 89     #gzip_vary on;
 90
 91     #########Nginx的server虛擬主機配置
 92     server {
 93         #監聽埠為 80
 94         listen       80;
 95
 96         #設置主機功能變數名稱
 97         server_name  localhost;
 98
 99         #設置訪問的語言編碼
100         #charset koi8-r;
101
102         #設置虛擬主機訪問日誌的存放路徑及日誌的格式為main
103         #access_log  logs/host.access.log  main;
104
105         #設置虛擬主機的基本信息
106         location / {
107             #設置虛擬主機的網站根目錄
108             root   html;
109
110             #設置虛擬主機預設訪問的網頁
111             index  index.html index.htm;
112         }
113
114         #error_page  404              /404.html;
115
116         # redirect server error pages to the static page /50x.html
117         #
118         error_page   500 502 503 504  /50x.html;
119         location = /50x.html {
120             root   html;
121         }
122
123         # proxy the PHP scripts to Apache listening on 127.0.0.1:80
124         #
125         #location ~ \.php$ {
126         #    proxy_pass   http://127.0.0.1;
127         #}
128
129         # pass the PHP scripts to FastCGI server listening on 127.0.0.1:9000
130         #
131         #location ~ \.php$ {
132         #    root           html;
133         #    fastcgi_pass   127.0.0.1:9000;
134         #    fastcgi_index  index.php;
135         #    fastcgi_param  SCRIPT_FILENAME  /scripts$fastcgi_script_name;
136         #    include        fastcgi_params;
137         #}
138
139         # deny access to .htaccess files, if Apache's document root
140         # concurs with nginx's one
141         #
142         #location ~ /\.ht {
143         #    deny  all;
144         #}
145     }
146
147
148     # another virtual host using mix of IP-, name-, and port-based configuration
149     #
150     #server {
151     #    listen       8000;
152     #    listen       somename:8080;
153     #    server_name  somename  alias  another.alias;
154
155     #    location / {
156     #        root   html;
157     #        index  index.html index.htm;
158     #    }
159     #}
160
161
162     # HTTPS server
163     #
164     #server {
165     #    listen       443 ssl;
166     #    server_name  localhost;
167
168     #    ssl_certificate      cert.pem;
169     #    ssl_certificate_key  cert.key;
170
171     #    ssl_session_cache    shared:SSL:1m;
172     #    ssl_session_timeout  5m;
173
174     #    ssl_ciphers  HIGH:!aNULL:!MD5;
175     #    ssl_prefer_server_ciphers  on;
176
177     #    location / {
178     #        root   html;
179     #        index  index.html index.htm;
180     #    }
181     #}
182
183 }
3.Nginx代理網站
a.我在tomcat下部署了一個javaweb項目,tomcat安裝的伺服器IP為:192.168.37.136,部署的項目在tomcat下的訪問地址為:http://192.168.37.136:8080/lywh/
b.我在IP為192.168.37.133的伺服器下麵安裝成功了Nginx。
c.那怎麼樣將tomcat下部署的網站使用Nginx代理呢?,修改Nginx的配置文件,修改命令:vim /usr/local/nginx/conf/nginx.conf
  1 #user  nobody;
  2 worker_processes  1;
  3 #error_log  logs/error.log;
  4 #error_log  logs/error.log  notice;
  5 #error_log  logs/error.log  info;
  7 #pid        logs/nginx.pid;
 10 events {
 11     worker_connections  1024;
 12 }
 15 http {
 16     include       mime.types;
 17     default_type  application/octet-stream;
 18
 19     #log_format  main  '$remote_addr - $remote_user [$time_local] "$request" '
 20     #                  '$status $body_bytes_sent "$http_referer" '
 21     #                  '"$http_user_agent" "$http_x_forwarded_for"';
 22
 23     #access_log  logs/access.log  main;
 24
 25     sendfile        on;
 26     #tcp_nopush     on;
 27
 28     #keepalive_timeout  0;
 29     keepalive_timeout  65;
 30
 31     #gzip  on;
 32
 33     #配置tomcat的IP地址和訪問埠
 34     upstream gw {
 35         server 192.168.37.136:8080 weight=1;
 36     }
 37     server {
 38         listen       80;
 39         server_name  localhost;
 40
 41         #charset koi8-r;
 42
 43         #access_log  logs/host.access.log  main;
 44
 45         location / {
 46             root   html;
 47             index  index.html index.htm;
 48         }
 49     #Nginx代理配置
 50     location /lywh {
 51         proxy_pass http://gw/lywh;
 52     }
 53     location /sapi {
 54         proxy_pass http://gw/shopappapi;
 55     }
 56     location /cas{
 57         proxy_pass http://gw/cas-server-webapp-4.0.0/login;
 58     }
 59     location /doc{
 60         proxy_pass http://gw/docs;
 61     }
 62
 63     #error_page  404              /404.html;
 64
 65         # redirect server error pages to the static page /50x.html
 66         #
 67         error_page   500 502 503 504  /50x.html;
 68         location = /50x.html {
 69             root   html;
 70         }
 71
 72         # proxy the PHP scripts to Apache listening on 127.0.0.1:80
 73         #
 74         #location ~ \.php$ {
 75         #    proxy_pass   http://127.0.0.1;
 76         #}
 77
 78         # pass the PHP scripts to FastCGI server listening on 127.0.0.1:9000
 79         #
 80         #location ~ \.php$ {
 81         #    root           html;
 82         #    fastcgi_pass   127.0.0.1:9000;
 83         #    fastcgi_index  index.php;
 84         #    fastcgi_param  SCRIPT_FILENAME  /scripts$fastcgi_script_name;
 85         #    include        fastcgi_params;
 86         #}
 87
 88         # deny access to .htaccess files, if Apache's document root
 89         # concurs with nginx's one
 90         #
 91         #location ~ /\.ht {
 92         #    deny  all;
 93         #}
 94     }
 95
 96
 97     # another virtual host using mix of IP-, name-, and port-based configuration
 98     #
 99     #server {
100     #    listen       8000;
101     #    listen       somename:8080;
102     #    server_name  somename  alias  another.alias;
103
104     #    location / {
105     #        root   html;
106     #        index  index.html index.htm;
107     #    }
108     #}
109
110
111     # HTTPS server
112     #
113     #server {
114     #    listen       443 ssl;
115     #    server_name  localhost;
116
117     #    ssl_certificate      cert.pem;
118     #    ssl_certificate_key  cert.key;
119
120     #    ssl_session_cache    shared:SSL:1m;
121     #    ssl_session_timeout  5m;
122
123     #    ssl_ciphers  HIGH:!aNULL:!MD5;
124     #    ssl_prefer_server_ciphers  on;
125
126     #    location / {
127     #        root   html;
128     #        index  index.html index.htm;
129     #    }
130     #}
131
132 }
d.當配置完Nginx.conf之後,關閉文件,執行命令檢查配置的文件是否有問題,如果如圖所示則說明沒有問題,否則需要檢查配置是否出現問題

e.檢查如果返回ok,則說明修改文件沒有出現任何錯誤,這時候重啟Nginx,命令為: /usr/local/nginx/sbin/nginx -s reload
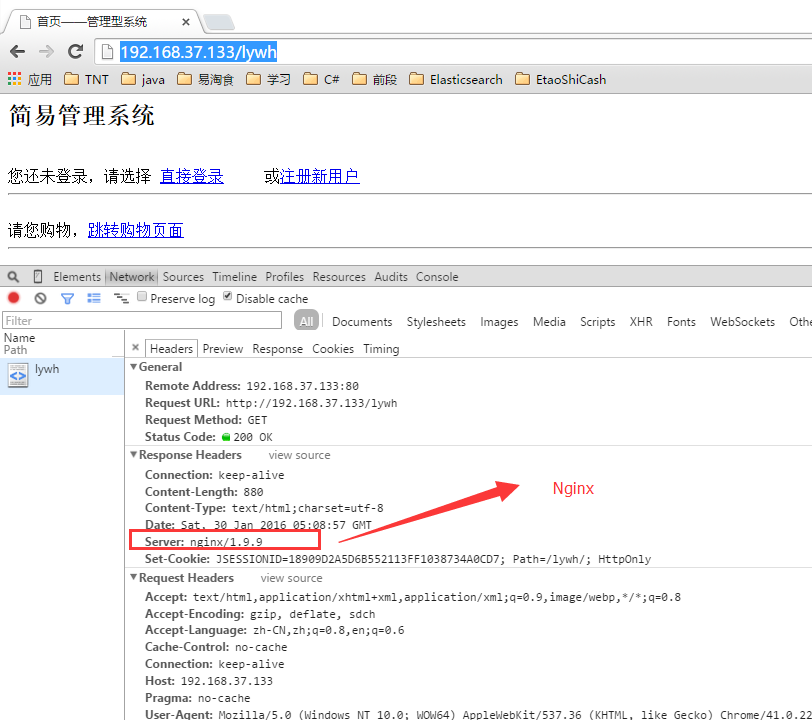
f.最後訪問代理後的網站,http://192.168.37.133/lywh,如圖所示:則說明已經代理訪問:
這篇筆記已寫完,如果大家有什麼疑問可以和我探討,我也是一邊學習一邊寫的筆記,如哪裡有錯誤之處,請告知
最後祝願大家新年快樂,明天回家,旅途順利

