
Nancy中Pipelines三兄弟(Before After OnError)的簡要概述以及多種用法。
一、簡單描述
Before:如果返回null,攔截器將主動權轉給路由;如果返回Response對象,則路由不起作用。
After : 沒有返回值,可以在這裡修改或替換當前的Response。
OnError : 返回值與Before相似,引發的錯誤或異常時的控制代碼可以寫在這裡。
這三兄弟的大致作用,看名字,也可以這樣簡單的理解:
Before:處理之前要乾的事。(返回null,繼續處理;返回Response對象,不再做要乾的那件事,換做Response對象要乾的事)
After : 處理之後要乾的事。
OnError : 處理出錯了要乾的事。
這三兄弟在NancyModule中的定義如下
1 public AfterPipeline After { get; set; }
2 public BeforePipeline Before { get; set; }
3 public ErrorPipeline OnError { get; set; }
而這三個Pipeline分別繼承了
AsyncNamedPipelineBase<TAsyncDelegate, TSyncDelegate>和NamedPipelineBase<TDelegate>
所以與他們有關的就主要包含在5個類中!具體的放在最後來看一下!
二、簡單用法
我們可以在Module中直接使用Before/After/OnError這三個
也可以在Bootstrapper中重寫RequestStartup或者ApplicationStartup來實現
當然也可以自定義,只要實現IRequestStartup或者IApplicationStartup介面也可以完成相應的工作
下麵我們就分別來說明一下
用法一:直接在Module中使用
定義一個BaseModule,具體如下:
 1     public class BaseModule : NancyModule
 2     {
 3         public BaseModule()
 4         {
 5             //寫法一
 6             Before += ctx => {
 7                 System.Diagnostics.Debug.WriteLine("BaseModule---Before");
 8                 return null;
 9             };
10             After += ctx => {
11                 System.Diagnostics.Debug.WriteLine("BaseModule---After");
12             };
13             OnError += (ctx, ex) => {
14                 System.Diagnostics.Debug.WriteLine("BaseModule---OnError");
15                 System.Diagnostics.Debug.WriteLine(ex.ToString());
16                 return null;
17             };
18             //寫法二
19             //Before += MyBefore;
20             //After += MyAfter;
21             //OnError += MyOnError;
22         }
23         private Response MyBefore(NancyContext ctx)
24         {
25             System.Diagnostics.Debug.WriteLine("BaseModule---Before----寫法二");
26             return null;
27         }
28         private void MyAfter(NancyContext ctx)
29         {
30             System.Diagnostics.Debug.WriteLine("BaseModule---After----寫法二");
31         }
32         private Response MyOnError(NancyContext ctx, Exception ex)
33         {
34             System.Diagnostics.Debug.WriteLine("BaseModule---OnError----寫法二");
35             System.Diagnostics.Debug.WriteLine(ex.ToString());
36             return null;
37         }
38     }
在BaseModule中,用了兩種不同的形式來對Before、After、OnError進行處理,
都只是列印出一些簡單的信息,看這些輸出的信息,可以幫助理解內部執行的順序!
可以看到,Before和OnError是Response類型的,After是void類型的
在這三兄弟的具體處理中,要根據實際情況來定(當然,你想就列印出一些東西也沒問題,畢竟我們還是可以把這些東西寫進日記嘛)!
下麵定義一個HomeModule,具體如下:
1     public class HomeModule : BaseModule
2     {
3         public HomeModule()
4         {
5             Get["/"] = _ => "Catcher Wong";
6             Get["/err"] = _ => { throw new Exception("there're some errors"); };
7         }
8     }
其中,當我們訪問http://localhost:port時,會顯示我們的文字,訪問http://localhost:port/err時,會拋出我們設定異常!
運行起來,看看我們的Output(輸出)視窗
這是訪問http://localhost:port時的情況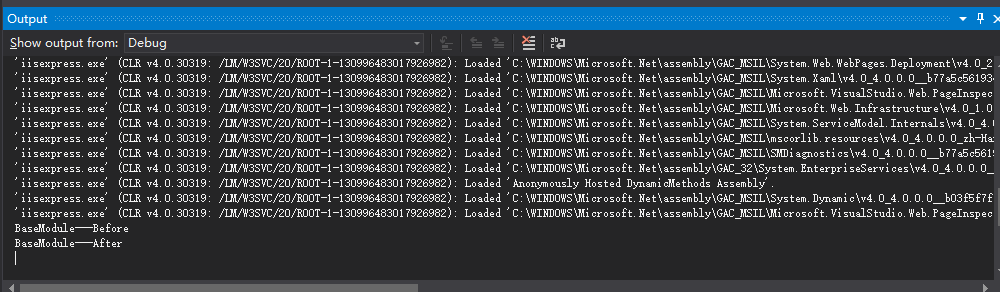
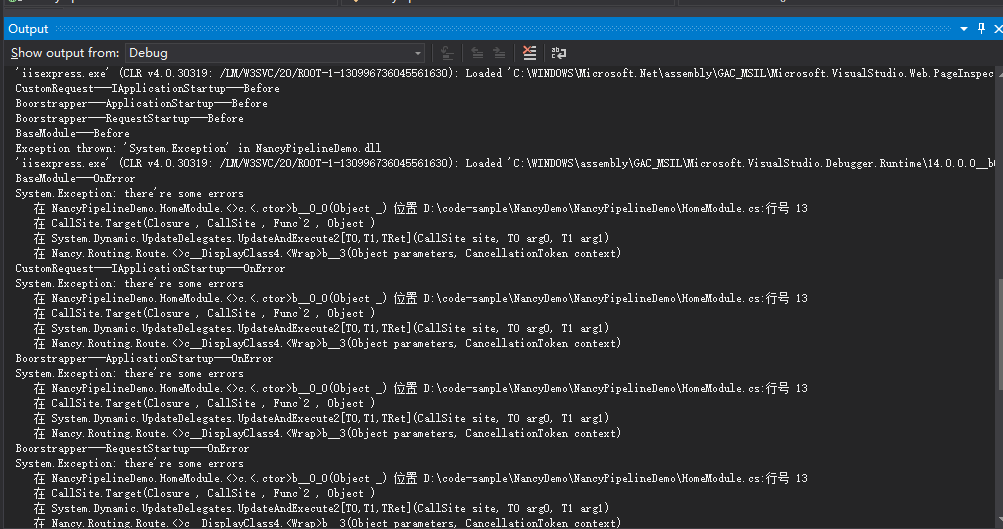
訪問http://localhost:port/err時的情況
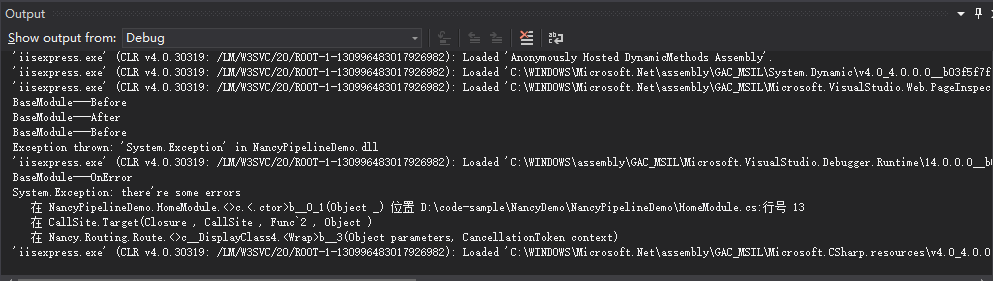
出現異常後並沒有去執行After!!執行完OnError之後就結束了。
同樣的,用寫法二也是如此!
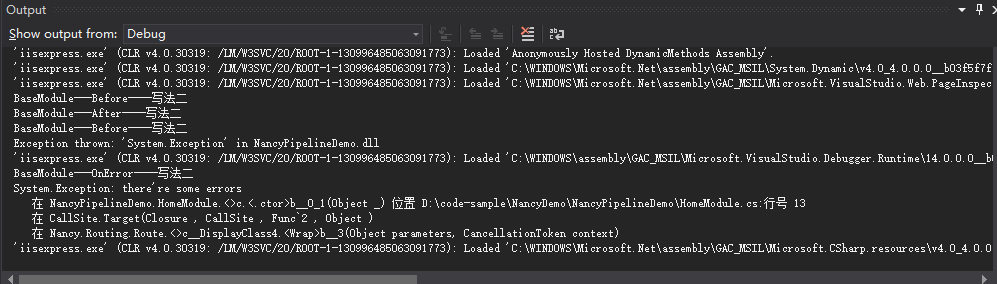
基本一致的效果。
用法二:在bootstrapper中重寫RequestStartup或者ApplicationStartup
先來看看重寫RequestStartup
 1     public class Bootstrapper : DefaultNancyBootstrapper
 2     {
 3         protected override void RequestStartup(TinyIoCContainer container, IPipelines pipelines, NancyContext context)
 4         {
 5             base.RequestStartup(container, pipelines, context);
 6             pipelines.BeforeRequest += ctx => {
 7                 System.Diagnostics.Debug.WriteLine("Boorstrapper---RequestStartup---Before");
 8                 return null;
 9             };
10             pipelines.AfterRequest += ctx => {
11                 System.Diagnostics.Debug.WriteLine("Boorstrapper---RequestStartup---After");
12             };
13             pipelines.OnError += (ctx,ex) => {
14                 System.Diagnostics.Debug.WriteLine("Boorstrapper---RequestStartup---OnError");
15                 System.Diagnostics.Debug.WriteLine(ex.ToString());
16                 return null;
17             };
18         }
19     }
我們同樣是輸出相應的信息,運行前,把我們BaseModule中“三兄弟”的註釋掉

再來看看重寫ApplicationStartup
 1      public class Bootstrapper : DefaultNancyBootstrapper
 2     {
 3         protected override void ApplicationStartup(TinyIoCContainer container, IPipelines pipelines)
 4         {
 5             base.ApplicationStartup(container, pipelines);
 6             pipelines.BeforeRequest += MyBeforeRequest;
 7             pipelines.AfterRequest += MyAfterRequest;
 8             pipelines.OnError += MyOnErroe;
 9         }
10         private Response MyBeforeRequest(NancyContext ctx)
11         {
12             System.Diagnostics.Debug.WriteLine("Boorstrapper---ApplicationStartup---Before");
13             return null;
14         }
15         private void MyAfterRequest(NancyContext ctx)
16         {
17             System.Diagnostics.Debug.WriteLine("Boorstrapper---ApplicationStartup---After");
18         }
19         private Response MyOnErroe(NancyContext ctx, Exception ex)
20         {
21             System.Diagnostics.Debug.WriteLine("Boorstrapper---ApplicationStartup---OnError");
22             System.Diagnostics.Debug.WriteLine(ex.ToString());
23             return null;
24         }
25     }
我們同樣是輸出相應的信息,運行前,把我們BaseModule和RequestStartup中“三兄弟”的註釋掉

用法三:自定義用法(Nancy中有很多東西可以自定義,這個很靈活,很nice!)
下麵來看看自定就要怎麼使用!
 1     public class CustomRequest : IApplicationStartup
 2     {
 3         public void Initialize(IPipelines pipelines)
 4         {
 5             pipelines.BeforeRequest.AddItemToEndOfPipeline(ctx =>
 6             {
 7                 System.Diagnostics.Debug.WriteLine("CustomRequest---IApplicationStartup---Before");
 8                 return null;
 9             });
10             pipelines.AfterRequest.AddItemToEndOfPipeline(ctx =>
11             {
12                 System.Diagnostics.Debug.WriteLine("CustomRequest---IApplicationStartup---After");
13             });
14             pipelines.OnError.AddItemToEndOfPipeline((ctx, ex) =>
15             {
16                 System.Diagnostics.Debug.WriteLine("CustomRequest---IApplicationStartup---OnError");
17                 System.Diagnostics.Debug.WriteLine(ex.ToString());
18                 return null;
19             });
20         }
21     }
我們自定義一個CustomRequest讓它實現IApplicationStartup介面即可!
剩下的就是實現Before、After、OnError的處理!!
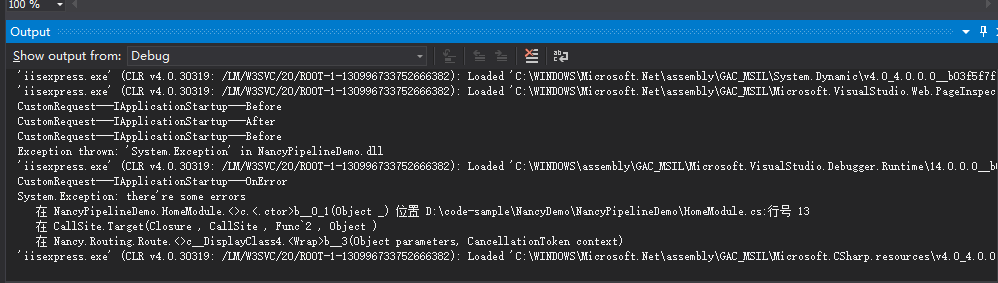
把之前的相關處理註釋掉,運行。
效果如下:
 前面提到的,都是每種用法單獨的運行執行效果,那麼,每種用法的執行順序呢?下麵來看看,把所有的註釋去掉,運行
現在是否很清晰呢?
Before 的執行順序 IApplicationStartup > ApplicationStartup > RequestStartup > BaseModule
OnError的執行順序 BaseModule > IApplicationStartup > ApplicationStartup > RequestStartup 再來看看After的執行順序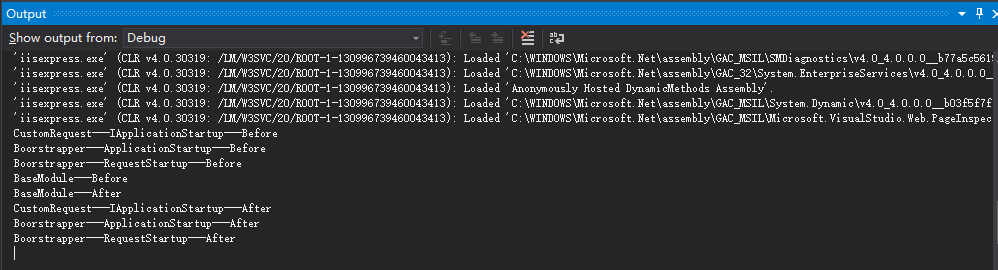
與OnError的處理順序一樣!!
三、內部實現的簡單分析
前面也提到了,這三兄弟的實現主要有這幾個類
BeforePipeline、AfterPipeline、ErrorPipeline以及抽象類NamedPipelineBase、AsyncNamedPipelineBase
NancyModule中也有相應的Before、After、OnError定義!
先來看看BeforePipeline吧
BeforePipeline是實現了AsyncNamedPipelineBase這個抽象類
裡面有用到 implicit operator ,不熟悉的可以參考
有一個重寫的Wrap方法,用於把同步的包裝成非同步的形式
 1         protected override PipelineItem<Func<NancyContext, CancellationToken, Task<Response>>> Wrap(PipelineItem<Func<NancyContext, Response>> pipelineItem)
 2         {
 3             var syncDelegate = pipelineItem.Delegate;
 4             Func<NancyContext, CancellationToken, Task<Response>> asyncDelegate = (ctx, ct) =>
 5             {
 6                 var tcs = new TaskCompletionSource<Response>();
 7                 try
 8                 {
 9                     var result = syncDelegate.Invoke(ctx);
10                     tcs.SetResult(result);
11                 }
12                 catch (Exception e)
13                 {
14                     tcs.SetException(e);
15                 }
16                 return tcs.Task;
17             };
18             return new PipelineItem<Func<NancyContext, CancellationToken, Task<Response>>>(pipelineItem.Name, asyncDelegate);
19         }
其他的大致都可以總結成下麵這句代碼:
pipeline.AddItemToEndOfPipeline(xxxx);
把xxxx添加到管道中的末尾去。
同樣的,AfterPipeline與ErrorPipeline也是相類似的,
不同的是ErrorPipeline實現的是NamedPipelineBase這個抽象類,
沒有那個Wrap方法,多了一個dynamic的Invoke方法
 1         public dynamic Invoke(NancyContext context, Exception ex)
 2         {
 3             dynamic returnValue = null;
 4             using (var enumerator = this.PipelineDelegates.GetEnumerator())
 5             {
 6                 while (returnValue == null && enumerator.MoveNext())
 7                 {
 8                     returnValue = enumerator.Current.Invoke(context, ex);
 9                 }
10             }
11             return returnValue;
12         }
這個Invoke方法的作用是:依次調用每個管道項目,直到有管道項目被返回或者所有管道項目都已經被調用了!
兩個NamePipelineBase(同步和非同步)都定義了一個pipelineItems(要執行的管道項目集合)
還有眾多虛方法!!大部分是插入的,還有一個刪除的。
其中插入可分為在Pipeline的開始和結尾插入,以及是否要替換已存在的同名的Pipeline
下麵的是比較重要的一個方法InsertItemAtPipelineIndex
同步的
1          public virtual void InsertItemAtPipelineIndex(int index, PipelineItem<TDelegate> item, bool replaceInPlace = false)
2         {
3             var existingIndex = this.RemoveByName(item.Name);
4             var newIndex = (replaceInPlace && existingIndex != -1) ? existingIndex : index;
5             this.pipelineItems.Insert(newIndex, item);
6         }
非同步的
1         public virtual void InsertItemAtPipelineIndex(int index, PipelineItem<TAsyncDelegate> item, bool replaceInPlace = false)
2         {
3             var existingIndex = this.RemoveByName(item.Name);
4             var newIndex = (replaceInPlace && existingIndex != -1) ? existingIndex : index;
5             this.pipelineItems.Insert(newIndex, item);
6         }
這個方法的主要作用是將item插入到Pipeline的指定位置!(同步和非同步的都有相應的實現!!不同的是item的類型而已!) 內部實現,簡單點的說法就是:就把我們寫的東西添加進Pipline去處理
最後來看看我們在Bootstrapper和自定義用到的IPipelines
1     public interface IPipelines
2     {
3         BeforePipeline BeforeRequest { get; set; }
4         AfterPipeline AfterRequest { get; set; }
5         ErrorPipeline OnError { get; set; }
6     }
十分簡單的定義!

