
一. 測試代碼 @RestController @RequestMapping("/book") public class BookController { @PostMapping("add") public JsonResponse<Integer> add(@Valid @RequestBod ...
一. 測試代碼
@RestController
@RequestMapping("/book")
public class BookController {

    @PostMapping("add")
    public JsonResponse<Integer> add(@Valid @RequestBody Book book, BindingResult errors){
        //1. 對 item  數據進行驗證
        StringBuffer sb = new StringBuffer();
        if (errors.hasErrors()) {
            for (ObjectError objectError : errors.getAllErrors()) {
                sb.append(objectError.getDefaultMessage());
            }
        }
        if (sb.length() > 0) {
            return JsonResponse.error(sb.toString());
        }
        int id = BookDB.add(book);
        return JsonResponse.success(id);
    }

    @GetMapping("getById")
    public JsonResponse<Book> getById(@RequestParam("id") Integer id){
        Book book = BookDB.getById(id);
        return JsonResponse.success(book);
    }

    @GetMapping("getAll")
    public JsonResponse<List<Book>> getAll(){
        List<Book> list = BookDB.getAll();
        return JsonResponse.success(list);
    }
}
在 BookController 中, 有三個方法可以訪問.
/book/add -> add()
/book/getById -> getById()
/book/getAll -> getAll()
url 和 對應的名字, 是可以不一樣的, 比如 我新寫個方法:
@GetMapping("byWhat")
public JsonResponse<Book> getBy(){return JsonResponse.success(null);
}
此時的對應關係就是: /book/byWhat -> getBy() 方法.
這種映射, 就是一種路由關係. 通過地址路由到方法上.
二. 建立路由
1. 配置文件配置
DispatcherServlet.properties 文件中配置了兩個路由處理類:
org.springframework.web.servlet.HandlerMapping=org.`.web.servlet.handler.BeanNameUrlHandlerMapping,\
    org.springframework.web.servlet.mvc.method.annotation.RequestMappingHandlerMapping
2. 配置類配置
spring-boot-autoconfigure 中, 有一塊專門對 web 進行配置的類, WebMvcAutoConfiguration 是其中之一
@Bean
public SimpleUrlHandlerMapping faviconHandlerMapping() {
    SimpleUrlHandlerMapping mapping = new SimpleUrlHandlerMapping();
    mapping.setOrder(Ordered.HIGHEST_PRECEDENCE + 1);
    mapping.setUrlMap(Collections.singletonMap("**/favicon.ico",
            faviconRequestHandler()));
    return mapping;
}

@Bean
public ResourceHttpRequestHandler faviconRequestHandler() {
    ResourceHttpRequestHandler requestHandler = new ResourceHttpRequestHandler();
    requestHandler.setLocations(resolveFaviconLocations());
    return requestHandler;
}
3. 類圖
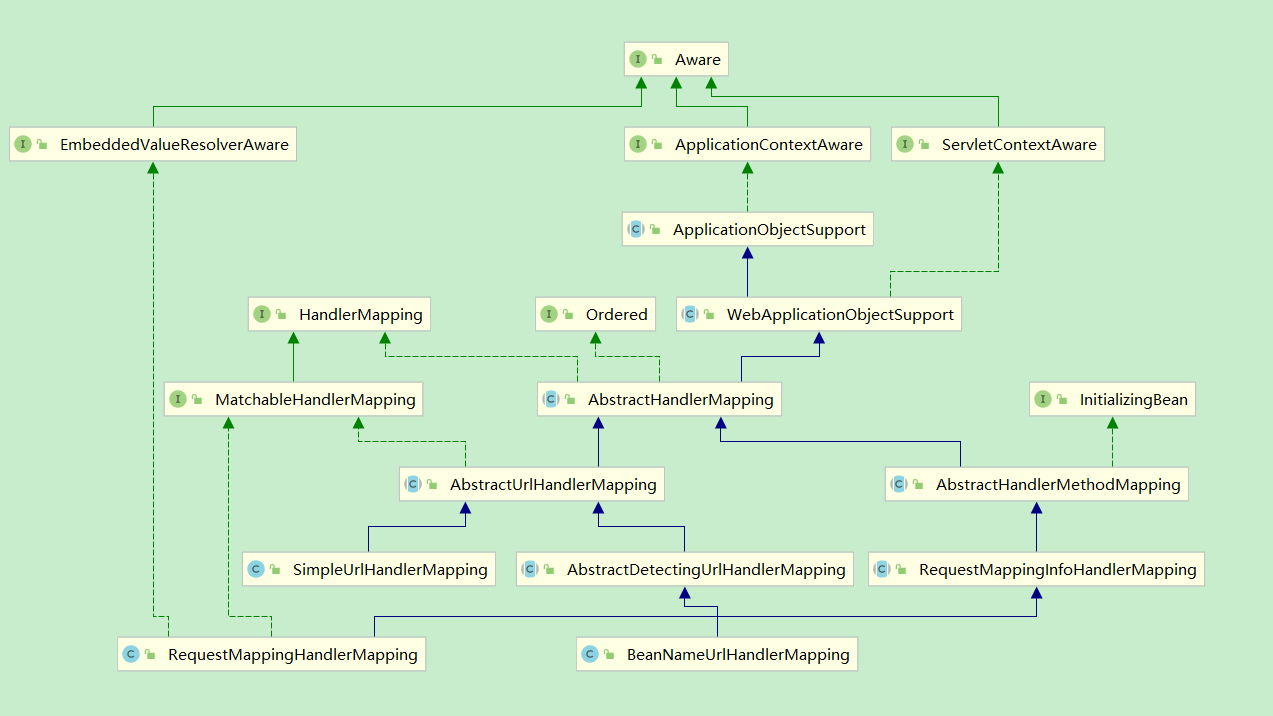
4. SimpleUrlHandlerMapping
由於 其 祖先類 ApplicationObjectSupport 實現了 ApplicationContextAware 介面, 所以在實例化後, 會調用 setApplicationContext() 方法:
@Override
public final void setApplicationContext(@Nullable ApplicationContext context) throws BeansException {
    if (context == null && !isContextRequired()) {
        // Reset internal context state.
        this.applicationContext = null;
        this.messageSourceAccessor = null;
    }
    else if (this.applicationContext == null) {
        // Initialize with passed-in context.
        if (!requiredContextClass().isInstance(context)) {
            throw new ApplicationContextException(
                    "Invalid application context: needs to be of type [" + requiredContextClass().getName() + "]");
        }
        this.applicationContext = context;
        this.messageSourceAccessor = new MessageSourceAccessor(context);
        initApplicationContext(context);
    }
    else {
        // Ignore reinitialization if same context passed in.
        if (this.applicationContext != context) {
            throw new ApplicationContextException(
                    "Cannot reinitialize with different application context: current one is [" +
                    this.applicationContext + "], passed-in one is [" + context + "]");
        }
    }
}

protected void initApplicationContext(ApplicationContext context) throws BeansException {
    initApplicationContext();
}

//空方法, 被子類重寫
protected void initApplicationContext() throws BeansException {
}
SimpleUrlHandlerMapping 重寫了 initApplicationContext 方法:
@Override
public void initApplicationContext() throws BeansException {
  //此處調用了 AbstractHandlerMapping 中的方法
    super.initApplicationContext();
    registerHandlers(this.urlMap);
}

protected void registerHandlers(Map<String, Object> urlMap) throws BeansException {
    if (urlMap.isEmpty()) {
        logger.warn("Neither 'urlMap' nor 'mappings' set on SimpleUrlHandlerMapping");
    }
    else {
        urlMap.forEach((url, handler) -> {
            // Prepend with slash if not already present.
            if (!url.startsWith("/")) {
                url = "/" + url;
            }
            // Remove whitespace from handler bean name.
            if (handler instanceof String) {
                handler = ((String) handler).trim();
            }
            registerHandler(url, handler);
        });
    }
}
在 faviconHandlerMapping() 中, 設置了 urlMap, 經過上面的方法後, 其關係為
/**/favicon.ico -> ResourceHttpRequestHandler
然後對其進行註冊:
protected void registerHandler(String urlPath, Object handler) throws BeansException, IllegalStateException {
    Assert.notNull(urlPath, "URL path must not be null");
    Assert.notNull(handler, "Handler object must not be null");
    Object resolvedHandler = handler;

    // Eagerly resolve handler if referencing singleton via name.
    if (!this.lazyInitHandlers && handler instanceof String) {
        String handlerName = (String) handler;
        ApplicationContext applicationContext = obtainApplicationContext();
        if (applicationContext.isSingleton(handlerName)) {
            resolvedHandler = applicationContext.getBean(handlerName);
        }
    }

    Object mappedHandler = this.handlerMap.get(urlPath);
    if (mappedHandler != null) {
        if (mappedHandler != resolvedHandler) {
            throw new IllegalStateException(
                    "Cannot map " + getHandlerDescription(handler) + " to URL path [" + urlPath +
                    "]: There is already " + getHandlerDescription(mappedHandler) + " mapped.");
        }
    }
    else {
        if (urlPath.equals("/")) {
            if (logger.isInfoEnabled()) {
                logger.info("Root mapping to " + getHandlerDescription(handler));
            }
            setRootHandler(resolvedHandler);
        }
        else if (urlPath.equals("/*")) {
            if (logger.isInfoEnabled()) {
                logger.info("Default mapping to " + getHandlerDescription(handler));
            }
            setDefaultHandler(resolvedHandler);
        }
        else {
            this.handlerMap.put(urlPath, resolvedHandler);
            if (logger.isInfoEnabled()) {
                logger.info("Mapped URL path [" + urlPath + "] onto " + getHandlerDescription(handler));
            }
        }
    }
}
5. BeanNameUrlHandlerMapping
這個類並沒有重寫 initApplicationContext() 方法. 但是他的父類 AbstractDetectingUrlHandlerMapping 重寫了此方法:
@Override
public void initApplicationContext() throws ApplicationContextException {
    super.initApplicationContext();
    detectHandlers();
}

protected void detectHandlers() throws BeansException {
    ApplicationContext applicationContext = obtainApplicationContext();
    if (logger.isDebugEnabled()) {
        logger.debug("Looking for URL mappings in application context: " + applicationContext);
    }
   //拿取容器中所有的 bean
    String[] beanNames = (this.detectHandlersInAncestorContexts ?
            BeanFactoryUtils.beanNamesForTypeIncludingAncestors(applicationContext, Object.class) :
            applicationContext.getBeanNamesForType(Object.class));

    //遍歷容器中所有的 bean, 按照規則, 進行 urls 的生成工作
    // Take any bean name that we can determine URLs for.
    for (String beanName : beanNames) {
     //這個是一個抽象方法, 留給子類BeanNameUrlHandlerMapping實現的
        String[] urls = determineUrlsForHandler(beanName);
        if (!ObjectUtils.isEmpty(urls)) {
            // URL paths found: Let's consider it a handler.
            registerHandler(urls, beanName);
        }
        else {
            if (logger.isDebugEnabled()) {
                logger.debug("Rejected bean name '" + beanName + "': no URL paths identified");
            }
        }
    }
}
接著看一下 BeanNameUrlHandlerMapping 里的方法:
public class BeanNameUrlHandlerMapping extends AbstractDetectingUrlHandlerMapping {

    /**
     * Checks name and aliases of the given bean for URLs, starting with "/".
     */
    @Override
    protected String[] determineUrlsForHandler(String beanName) {
        List<String> urls = new ArrayList<>();
        if (beanName.startsWith("/")) {
            urls.add(beanName);
        }
        String[] aliases = obtainApplicationContext().getAliases(beanName);
        for (String alias : aliases) {
            if (alias.startsWith("/")) {
                urls.add(alias);
            }
        }
        return StringUtils.toStringArray(urls);
    }
}
determineUrlsForHandler 實現了父類留的坑, 此處主要是檢測 beanName 或其別名 是否是以 "/" 開頭的, 如果是, 則對其執行註冊方法 registerHandler(與前面4里是同一個方法).
在此例中, 並沒有 beanName 是以 "/" 開頭的, 所以這裡並沒有進行任何註冊操作.
6. RequestMappingHandlerMapping
RequestMappingHandlerMapping 並不是通過 initApplicationContext() 來進行掃描觸發的.

其祖先類 AbstractHandlerMethodMapping 實現了 InitializingBean 介面, 也就是說, 在屬性設置後, 會調用其 afterPropertiesSet() 方法.

但是  RequestMappingHandlerMapping 重寫了 afterPropertiesSet() 方法:
@Override
public void afterPropertiesSet() {
    this.config = new RequestMappingInfo.BuilderConfiguration();
    this.config.setUrlPathHelper(getUrlPathHelper());
    this.config.setPathMatcher(getPathMatcher());
    this.config.setSuffixPatternMatch(this.useSuffixPatternMatch);
    this.config.setTrailingSlashMatch(this.useTrailingSlashMatch);
    this.config.setRegisteredSuffixPatternMatch(this.useRegisteredSuffixPatternMatch);
    this.config.setContentNegotiationManager(getContentNegotiationManager());

    super.afterPropertiesSet();
}
super.afterPropertiesSet() 調用的就是 AbstractHandlerMethodMapping 的方法了.
@Override
public void afterPropertiesSet() {
    initHandlerMethods();
}

private static final String SCOPED_TARGET_NAME_PREFIX = "scopedTarget.";

protected void initHandlerMethods() {
    if (logger.isDebugEnabled()) {
        logger.debug("Looking for request mappings in application context: " + getApplicationContext());
    }
    //獲取容器中所有的 beanName
    String[] beanNames = (this.detectHandlerMethodsInAncestorContexts ?
            BeanFactoryUtils.beanNamesForTypeIncludingAncestors(obtainApplicationContext(), Object.class) :
            obtainApplicationContext().getBeanNamesForType(Object.class));

  //遍歷 beanName
    for (String beanName : beanNames) {
      //判斷 beanName是否以 scopedTarget. 開頭
        if (!beanName.startsWith(SCOPED_TARGET_NAME_PREFIX)) {
            Class<?> beanType = null;
            try {
                beanType = obtainApplicationContext().getType(beanName);
            }
            catch (Throwable ex) {
                // An unresolvable bean type, probably from a lazy bean - let's ignore it.
                if (logger.isDebugEnabled()) {
                    logger.debug("Could not resolve target class for bean with name '" + beanName + "'", ex);
                }
            }
            if (beanType != null && isHandler(beanType)) {
          //進一步處理
                detectHandlerMethods(beanName);
            }
        }
    }
    handlerMethodsInitialized(getHandlerMethods());
}
isHandler() 是一個過濾方法, 判斷 bean 是否有 Controller 或 RequestMapping 註解:
@Override
protected boolean isHandler(Class<?> beanType) {
    return (AnnotatedElementUtils.hasAnnotation(beanType, Controller.class) ||
            AnnotatedElementUtils.hasAnnotation(beanType, RequestMapping.class));
}
detectHandlerMethods() 能進來的, 此例中就 bookController 了.
protected void detectHandlerMethods(final Object handler) {
    Class<?> handlerType = (handler instanceof String ?
            obtainApplicationContext().getType((String) handler) : handler.getClass());

    if (handlerType != null) {
        final Class<?> userType = ClassUtils.getUserClass(handlerType);
        Map<Method, T> methods = MethodIntrospector.selectMethods(userType,
                (MethodIntrospector.MetadataLookup<T>) method -> {
                    try {
                        return getMappingForMethod(method, userType);
                    }
                    catch (Throwable ex) {
                        throw new IllegalStateException("Invalid mapping on handler class [" +
                                userType.getName() + "]: " + method, ex);
                    }
                });
        if (logger.isDebugEnabled()) {
            logger.debug(methods.size() + " request handler methods found on " + userType + ": " + methods);
        }
        methods.forEach((method, mapping) -> {
            Method invocableMethod = AopUtils.selectInvocableMethod(method, userType);
            registerHandlerMethod(handler, invocableMethod, mapping);
        });
    }
}
methods 就是 BookController 裡面的那三個方法: add , getById, getAll
查找的基本思路:
1. 拿到spring容器中所有的 beanNames
2. 遍歷beanNames, 進行過濾, 過濾依據: bean上是否有 Controller 或 RequestMapping 註解修飾
3. 對 bean 進行處理, 拿到他和他所有父類中的方法
4. 對這些方法進行過濾, 過濾依據為: 方法上是否有 RequestMapping 註解修飾, 並創建 RequestMappingInfo 對象 - A.
5. 為 bean 也創建 RequestMappingInfo 對象 - B.
如果 B 為空(bean上沒有 RequestMappingInfo註解修飾), 則跳過合併操作
如果B不為空, 則對 A 和 B 進行合併操作. 路徑 "/book/add"也就組合出來了.
protected void registerHandlerMethod(Object handler, Method method, T mapping) {
    this.mappingRegistry.register(mapping, handler, method);
}

public void register(T mapping, Object handler, Method method) {
    this.readWriteLock.writeLock().lock();
    try {
        HandlerMethod handlerMethod = createHandlerMethod(handler, method);
        assertUniqueMethodMapping(handlerMethod, mapping);

        if (logger.isInfoEnabled()) {
            logger.info("Mapped \"" + mapping + "\" onto " + handlerMethod);
        }
        this.mappingLookup.put(mapping, handlerMethod);

        List<String> directUrls = getDirectUrls(mapping);
        for (String url : directUrls) {
            this.urlLookup.add(url, mapping);
        }

        String name = null;
        if (getNamingStrategy() != null) {
            name = getNamingStrategy().getName(handlerMethod, mapping);
            addMappingName(name, handlerMethod);
        }

        CorsConfiguration corsConfig = initCorsConfiguration(handler, method, mapping);
        if (corsConfig != null) {
        //如果配置了跨域, 此處還會對跨域進行記錄
            this.corsLookup.put(handlerMethod, corsConfig);
        }

        this.registry.put(mapping, new MappingRegistration<>(mapping, handlerMethod, directUrls, name));
    }
    finally {
        this.readWriteLock.writeLock().unlock();
    }
}
這裡的 mappingLookup 存放的是 RequestMappingInfo -> HandlerMethod
而 urlLookup 存放的是 url -> RequestMappingInfo
private final Map<T, HandlerMethod> mappingLookup = new LinkedHashMap<>();

private final MultiValueMap<String, T> urlLookup = new LinkedMultiValueMap<>();


